
Selecting the right ceiling lights transforms an ordinary room into a balanced, functional, and visually striking environment. Lighting defines how you experience architectural proportions, colors, textures, and daily tasks. Yet, homeowners and designers frequently struggle with improper sizing, incorrect hanging heights, clashing color temperatures, and inadequate light output. Installing a fixture that is either dwarfed by high ceilings or overwhelming in a compact space compromises both aesthetic appeal and practical comfort.
A successful interior lighting scheme requires a firm grasp of spatial geometry, lumen output, structural clearances, and layered illumination. Whether you are illuminating an expansive living room, renovating a narrow hallway, or upgrading bedroom ambiance, applying standardized architectural rules ensures error-free results. In this comprehensive guide, we unpack seven definitive, field-tested rules to help you choose, measure, layer, and install the perfect overhead fixtures for every room in your home.
1. Master the Golden Sizing Formula for Overhead Fixtures
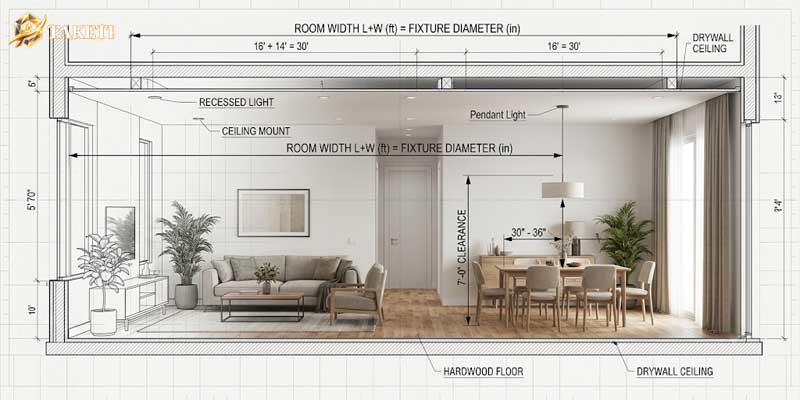
The most frequent error in residential interior design is guessing fixture diameter. A dining chandelier that measures too small looks like an afterthought, while an oversized flush mount in a modest foyer feels visually suffocating. Professional interior designers use a straightforward mathematical relationship between room dimensions and fixture diameter to establish ideal visual weight.
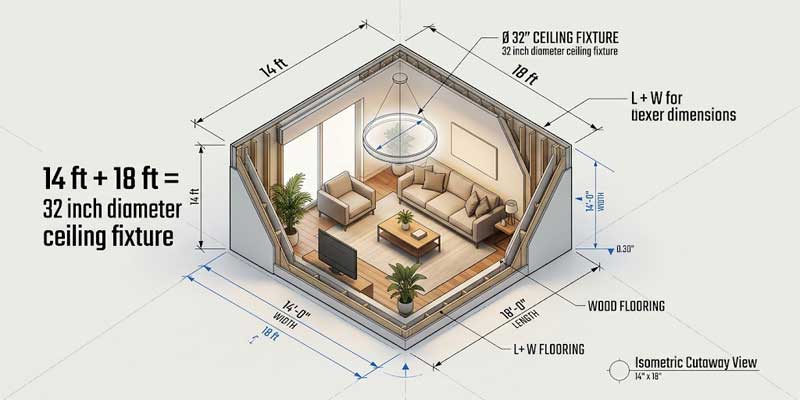
To determine the baseline fixture diameter in inches, measure the length and width of the room in feet, add those two numbers together, and convert the sum directly to inches. For example, if your living room measures 14 feet by 18 feet, add 14 plus 18 to get 32. Therefore, an overhead fixture measuring approximately 32 inches in diameter will provide proper visual proportion. This dimensional equation establishes optical balance without crowding surrounding wall art or window treatments.
| Room Dimensions (Feet) | Calculated Sum | Recommended Fixture Diameter (Inches) | Common Application |
|---|---|---|---|
| 8 ft x 10 ft | 18 | 17 – 19 inches | Small Home Office, Powder Room, Walk-in Closet |
| 10 ft x 12 ft | 22 | 20 – 24 inches | Guest Bedroom, Standard Kitchen, Laundry |
| 12 ft x 15 ft | 27 | 26 – 28 inches | Primary Bedroom, Formal Dining Room |
| 14 ft x 18 ft | 32 | 30 – 34 inches | Spacious Living Room, Great Room |
| 16 ft x 20 ft | 36 | 34 – 38 inches | Open Concept Living Area, Large Foyer |
When decorating an open-concept floor plan where the living, dining, and kitchen areas blend without physical walls, avoid calculating the entire square footage as one single space. Doing so produces an impractically massive fixture size. Instead, treat each functional sub-zone as a distinct room. Calculate the diameter for the primary seating zone based solely on the boundary of your area rug or furniture arrangement.
2. Choose Between Flush Mounts, Semi-Flush Mounts, Chandeliers, and Pendants
Ceiling height strictly dictates which profile category suits your interior. Fixture profiles are broadly divided into flush mounts, semi-flush mounts, chandeliers, and pendants. Installing an ornate hanging chandelier on an eight-foot ceiling creates head-clearance hazards, while mounting a tiny flat disk on a two-story vaulted ceiling fails to anchor the volume of space.
Flush-mount ceiling lights attach directly against the drywall with zero exposed stem or drop chain. They represent the safest, most efficient option for rooms with standard eight-foot ceilings or lower. Modern flush mounts utilize architectural diffusers, edge-lit LED modules, and metallic trims (such as brushed brass or matte black) to deliver sleek elegance without intruding into vertical living space.
Semi-flush fixtures extend four to twelve inches below the ceiling on a short downrod. This subtle drop allows light to reflect upward onto the ceiling surface as well as downward into the room. This bounce effect visually expands lower ceiling planes, creating the illusion of greater vertical height while keeping the base well above head clearance in walk paths.
Chandeliers and decorative pendant clusters require a minimum ceiling height of nine to ten feet. These fixtures serve as central visual focal points. When selecting multi-arm chandeliers, verify that the structural ceiling junction box supports the combined weight of the fixture and glass shades, especially in older residences.
3. Calculate Critical Vertical Clearance and Hanging Heights
Achieving structural balance requires precise vertical positioning. Walking under a low-hanging fixture causes physical obstruction and discomfort, whereas hanging a pendant too close to the ceiling disrupts light distribution. Follow established architectural clearance standards across various traffic zones.
Open Walkway and Hallway Clearances
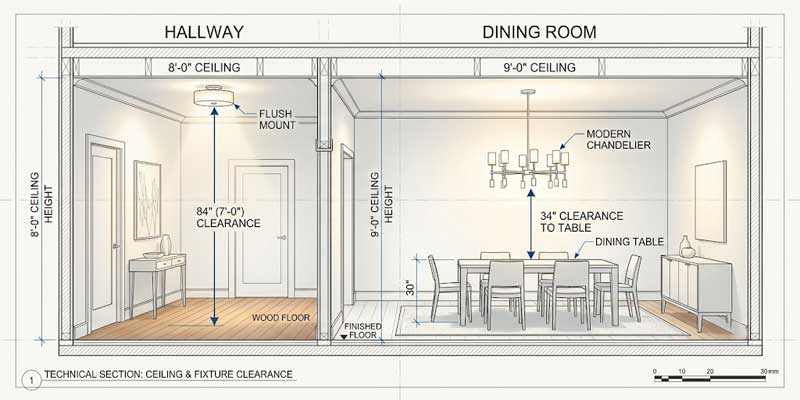
In entryways, foyers, hallways, and living spaces where people walk directly beneath the light, maintain a minimum clearance of 7 feet (84 inches) from the bottom of the fixture to the finished floor. If your room features eight-foot ceilings, your total fixture height cannot exceed 12 inches, mandating a flush mount or ultra-shallow semi-flush mount. For nine-foot ceilings, you have 24 inches of fixture drop to work with, opening up elegant semi-flush options.
Dining Table and Counter Clearances
When hanging pendants or chandeliers over a dining table or kitchen island, the 7-foot rule no longer applies because furniture prevents pedestrian transit underneath. Instead, position the bottom edge of the chandelier 30 to 36 inches above the tabletop surface for standard eight-foot ceilings. For ceilings higher than eight feet, raise the fixture by approximately three inches for each additional foot of ceiling height to maintain harmonious sightlines.
| Installation Location | Ceiling Height | Minimum Bottom Clearance | Fixture Profile Recommendation |
|---|---|---|---|
| Main Walkway / Hallway | 8 Feet | 7 Feet (84 Inches) from floor | Low-profile Flush Mount (Max 12″ height) |
| High Foyer / Walkway | 10+ Feet | 7 to 8 Feet from floor | Pendant, Lantern, or Semi-Flush Mount |
| Dining Room Table | 8 Feet | 30 to 36 Inches above table surface | Linear Suspension or Chandelier |
| Kitchen Prep Island | 9 Feet | 32 to 36 Inches above counter surface | Evenly spaced Mini-Pendants |
| Bed / Over Mattress | 8 – 9 Feet | 6.5 to 7 Feet from floor | Semi-Flush or Fabric Drum Shade |
4. Determine Total Lumen Output Across Specific Rooms
Gone are the days when wattage determined brightness. In the era of high-efficiency LED illumination, lumens measure the actual amount of visible light emitted by a fixture. Relying solely on a single overhead bulb to illuminate an entire room results in harsh shadows, glaring hotspots, and dark corners. Calculating precise lumen requirements ensures adequate illumination tailored to each space’s functional needs.
Lighting designers use foot-candles—the measure of light intensity falling on a one-square-foot surface—to calculate lumen needs. The standard formula multiplies room square footage by required foot-candles: Total Lumens = Room Square Footage x Foot-Candle Requirement. Living spaces require soft, ambient illumination (10 to 20 foot-candles), whereas task-intensive areas such as kitchens, home workshops, and bathrooms require crisp, focused lighting (30 to 50 foot-candles).
| Room Type | Target Foot-Candles | Example Room Size | Total Lumens Required |
|---|---|---|---|
| Living Room | 15 – 20 fc | 200 sq. ft. (10×20) | 3,000 – 4,000 Lumens |
| Primary Bedroom | 10 – 20 fc | 150 sq. ft. (10×15) | 1,500 – 3,000 Lumens |
| Dining Room | 20 – 30 fc | 140 sq. ft. (10×14) | 2,800 – 4,200 Lumens |
| Kitchen (General & Task) | 40 – 50 fc | 160 sq. ft. (10×16) | 6,400 – 8,000 Lumens |
| Bathroom Vanity Area | 50 – 70 fc | 60 sq. ft. (6×10) | 3,000 – 4,200 Lumens |
| Hallway / Corridor | 10 – 15 fc | 80 sq. ft. (4×20) | 800 – 1,200 Lumens |
Do not attempt to push all required lumens through a single central ceiling light. A living room requiring 4,000 lumens becomes uncomfortably bright if powered by one glaring central fixture. Instead, integrate a 2,000-lumen central overhead fixture and distribute the remaining 2,000 lumens across secondary lighting such as complementary table lamps for living room accent tables, perimeter wall sconces, and architectural floor lamps.
5. Select the Ideal Kelvin Color Temperature for Human Well-Being
Color temperature, measured in Kelvin (K), dictates the emotional tone and functionality of an interior space. The lower the Kelvin rating, the warmer and more amber the light; higher Kelvin ratings produce cooler, bluish-white light. Installing cool daylight bulbs (5000K) in a bedroom creates a sterile, hospital-like atmosphere that disrupts natural circadian rhythms, while installing dim, ultra-warm bulbs (2200K) over kitchen counters hinders safe food preparation.
Residential lighting falls into three core Kelvin ranges:
- Warm White (2700K – 3000K): Emits a cozy, golden-amber glow reminiscent of traditional incandescent filaments. This range is ideal for living rooms, bedrooms, lounges, and formal dining areas. It softens skin tones, creates an inviting atmosphere, and pairs naturally with rich wood furnishings.
- Soft Neutral White (3500K – 4000K): Delivers clean, balanced white illumination without harsh blue undertones. This color temperature works best in kitchens, laundry rooms, home offices, and modern bathrooms where visual clarity, accurate makeup application, and clean tile rendering are essential.
- Daylight / Cool White (5000K+): Mimics direct outdoor midday sunlight. This range should generally be avoided for general residential ceiling lights, as it suppresses melatonin production and feels clinical. Limit cool white LEDs strictly to utility garages, basement tool benches, or commercial workshops.
For transitional rooms, consider installing fixtures equipped with tunable CCT (Correlated Color Temperature) switches or smart LED engines. These systems allow you to shift from productive 3500K light during morning teleconferences to a relaxing 2700K glow during evening movie nights with a tap on your smartphone or smart switch.
6. Build a Cohesive Three-Tier Layered Lighting Plan
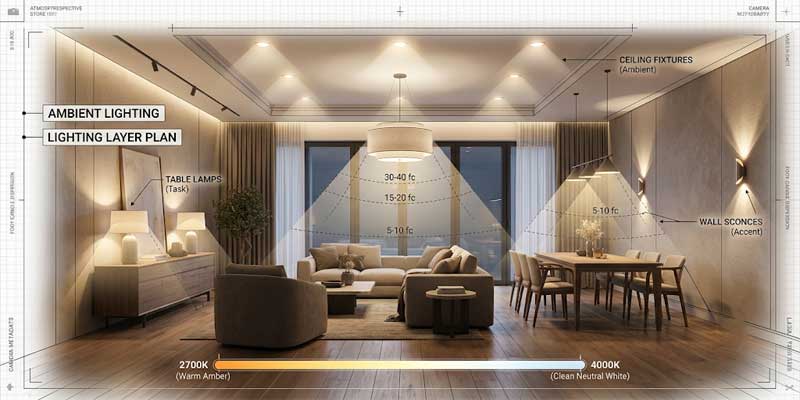
High-end architectural spaces feel inviting because they avoid flat, single-source illumination. A single ceiling light mounted in the center of the ceiling casts long downward shadows beneath eyes, cabinets, and furniture. To eliminate harsh shadows and create dynamic visual depth, balance your overhead fixtures within a three-tier lighting hierarchy: ambient, task, and accent lighting.
Ambient lighting serves as the foundational base layer, providing broad, even illumination across the room. Your primary flush mounts, semi-flush drums, chandeliers, or recessed ceiling grids form this core layer. Ambient light establishes safe navigation and prevents high-contrast eye fatigue during darker hours.
Task lighting targets specific work areas where direct visual acuity is required. In the kitchen, under-cabinet LED strips illuminate chopping surfaces without casting shadows from your body. In the living room, focused reading lamps flank armchairs. In sleep sanctuaries, dedicated bedroom table lamps allow for nighttime reading and winding down without disturbing a sleeping partner.
Accent lighting adds mood, texture, and visual drama. This layer highlights architectural alcoves, textured stone fireplaces, bookshelves, and art collections. Wall sconces, directional ceiling gimbals, interior display lights, and seasonal decorative table lamp fixtures bring spatial personality to life. When each layer operates on independent wall controls and dimmers, you gain complete command over room mood and function.
| Lighting Layer | Primary Function | Typical Fixture Types | Optimal Switching Setup |
|---|---|---|---|
| Ambient (Base) | General room illumination, navigation, overall visual comfort | Central Ceiling Lights, Flush Mounts, Chandeliers | Wall Dimmer Switch (Primary Door Entry) |
| Task (Functional) | Targeted, shadow-free light for cooking, reading, or working | Under-cabinet Bars, Pendants, Desk & Table Lamps | Local Switches, Dedicated Counter Switches |
| Accent (Aesthetic) | Depth, drama, architectural and artwork highlighting | Wall Sconces, Track Spotlights, Cabinet Cove LEDs | Independent Smart Switch or Secondary Wall Plate |
7. Address Structural Mounting, Electrical Compatibility, and Dimming Controls
Before purchasing your chosen ceiling fixture, inspect the structural and electrical hardware inside your ceiling junction box. Many homeowners fall in love with an exquisite brass fixture only to discover during installation that their electrical infrastructure is incompatible or unrated for the fixture’s physical weight.
Standard residential octagonal junction boxes are rated to support lighting fixtures weighing up to 50 pounds. If you are installing an expansive crystal chandelier, a heavy forged-iron ring, or a multi-tiered glass pendant assembly weighing more than 50 pounds, building safety codes mandate replacing the junction box with a heavy-duty, fan-rated ceiling box anchored securely to the framing joists. For fixtures exceeding 70 pounds, independent aircraft-cable safety tethers or structural ceiling crossbars must be anchored directly into structural ceiling joists.
Electrical dimming compatibility is equally critical. Fluorescent and old incandescent dimmers cause modern LED fixtures to flicker, hum, and wear out prematurely. When upgrading your overhead fixtures to LED, pair them with dedicated Electronic Low Voltage (ELV) or TRIAC LED-rated dimmers. Verify that the fixture specifies smooth, 0-10V or forward/reverse phase dimming down to 1% to eliminate annoying buzzing and erratic strobe effects.
Additionally, evaluate damp-rating certifications if you are mounting fixtures in bathrooms, covered exterior porches, or laundry rooms. Damp-rated ceiling lights feature sealed gaskets, moisture-resistant driver compartments, and rust-resistant hardware that prevent steam, condensation, and humidity from corroding sensitive internal circuits over time.
Summary Checklist for Perfect Ceiling Lighting
Selecting and installing the ideal overhead light requires balancing room scale, functional tasks, electrical hardware, and layered design. Keep this quick implementation checklist at hand before finalizing your interior renovation:
- Calculate Diameter: Measure room length and width in feet, add them together, and translate the sum directly to fixture diameter in inches.
- Respect Vertical Clearance: Maintain a minimum 7-foot walk clearance in hallways and paths; hang 30 to 36 inches above dining surfaces.
- Layer Total Lumens: Use foot-candle formulas to establish total lumen needs, dividing brightness across ceiling fixtures, wall sconces, and table lamps.
- Standardize Color Temperature: Choose 2700K – 3000K for cozy relaxation zones; select 3500K – 4000K for task-focused kitchens and modern workspaces.
- Verify Electrical Infrastructure: Check junction box weight limits, confirm LED dimmer compatibility, and use damp-rated fixtures in high-moisture rooms.
By approaching ceiling lighting with structured dimensions, proper lumen distribution, and layered fixtures, you create spaces that are as functional and comfortable as they are visually stunning.
