
Few architectural elements balance task utility and decorative artistry as effectively as a well-chosen pendant light. Suspended gracefully from above, pendant fixtures serve as intentional visual anchors that draw the eye, define functional zones, and sculpt the vertical volume of a room. Whether illuminating a bustling culinary kitchen island, creating an intimate dining vignette, or adding warmth beside a reading lounge, overhead suspensions dictate the ambiance of your entire interior layout.
Yet, achieving flawless pendant lighting requires far more than merely selecting an attractive glass shade or metallic finish. Homeowners and interior decorators constantly face installation dilemmas: choosing fixtures that appear dwarfed over a massive island, hanging shades at head-knocking heights, creating harsh downward glare, or miscalculating the electrical load. Mastering standard architectural formulas, clearance metrics, and visual proportions eliminates costly guesswork. In this definitive guide, we explore seven essential, field-tested rules to help you size, position, space, and install your suspension fixtures with absolute precision.
1. Determine Fixture Diameter and Canopy Proportions
Establishing ideal fixture scale represents the foundational step of suspension lighting. An undersized pendant looks lost and insignificant across an open expanse, while an oversized fixture overwhelms nearby cabinetry and obstructs sightlines across living zones. Interior designers use distinct mathematical relationships depending on whether the pendant light functions as a standalone central focal point or as part of a linear cluster.
When selecting a single statement pendant light to anchor a room (such as a bedroom reading corner, entryway, or small breakfast nook), measure the room length and width in feet. Add those two numbers together, and convert the total sum directly into inches. For instance, a 10-foot by 12-foot breakfast area yields a sum of 22 (10 + 12), indicating that a single pendant measuring approximately 22 inches in diameter provides ideal visual balance.
| Area Dimensions (Feet) | Calculated Sum | Single Statement Diameter (Inches) | Multi-Pendant Cluster Diameter (Inches) |
|---|---|---|---|
| 8 ft x 10 ft | 18 | 16 – 18 inches | 8 – 10 inches (Pair) |
| 10 ft x 12 ft | 22 | 20 – 24 inches | 10 – 12 inches (Pair or Trio) |
| 12 ft x 15 ft | 27 | 26 – 28 inches | 12 – 14 inches (Trio) |
| 14 ft x 18 ft | 32 | 30 – 34 inches | 14 – 16 inches (Trio) |
| 16 ft x 20 ft | 36 | 34 – 38 inches | 16 – 18 inches (Trio or Quad) |
When planning a linear row of pendants over a rectangular counter or table, individual fixture diameter must correspond directly to the counter width. A reliable design rule states that the diameter of each pendant should measure approximately one-half to two-thirds the width of the surface beneath it. For example, a kitchen island that is 36 inches wide comfortably accommodates pendants measuring between 12 and 18 inches in diameter. Fixtures exceeding this ratio crowd perimeter edges, resulting in a top-heavy visual impression.
2. Calculate Counter and Island Spacing Using the Spacing Formula
Suspending multiple fixtures over an island counter requires calculated spacing to maintain symmetry and deliver uniform illumination without casting dark shadows between stools. Installing pendants too close together creates visual clutter, while positioning them too far apart leaves dark gaps between light cones.
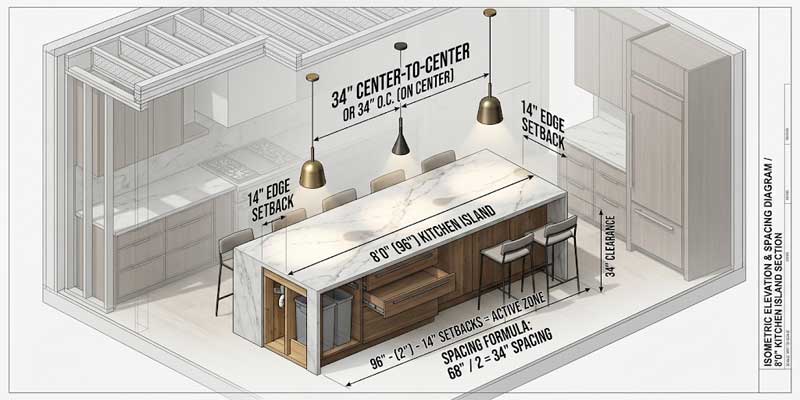
The standard architectural layout formula for kitchen island pendants begins with measuring the overall length of the island. Next, deduct a minimum setback buffer of 12 to 15 inches from each outer end of the counter to keep fixtures from crowding exterior edges. The remaining interior distance represents your usable hanging span. Divide this remaining span by the total number of fixtures plus one to establish the exact center-to-center distance between each suspension downrod.
| Island Length (Inches / Feet) | Recommended Quantity | Individual Diameter | Edge Setback | Center-to-Center Spacing |
|---|---|---|---|---|
| 48 to 60 inches (4 to 5 ft) | 2 Pendants | 8 – 10 inches | 12 inches | 24 – 30 inches apart |
| 72 to 84 inches (6 to 7 ft) | 2 Large or 3 Medium | 10 – 14 inches | 12 – 14 inches | 28 – 32 inches apart |
| 96 to 108 inches (8 to 9 ft) | 3 Pendants | 12 – 16 inches | 14 – 16 inches | 30 – 36 inches apart |
| 120 to 144 inches (10 to 12 ft) | 3 Large or 4 Medium | 14 – 18 inches | 15 – 18 inches | 32 – 38 inches apart |
For example, consider an 8-foot (96-inch) island where you intend to install three pendants. First, set each outer fixture 14 inches inward from the counter edges, leaving a 68-inch span between the two outer lights. Placing the third fixture directly at the 48-inch center point establishes identical 34-inch gaps between each fixture stem. This delivers balanced visual rhythm and even beam overlap across your primary culinary workspace.
3. Establish Exact Vertical Hanging Heights for Clear Sightlines
Nothing disrupts a kitchen or dining experience faster than a pendant hung at eye level that blocks conversation, or one suspended so low it poses an accidental collision risk. Hanging heights must balance task lighting performance with unobstructed architectural sightlines.
Dining Table and Island Counter Clearances
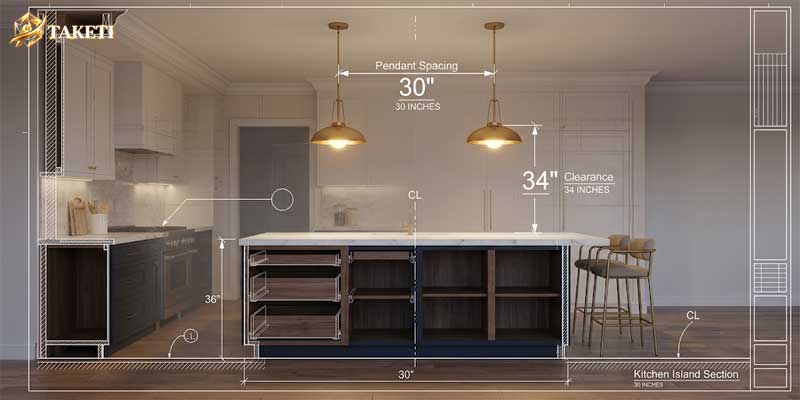
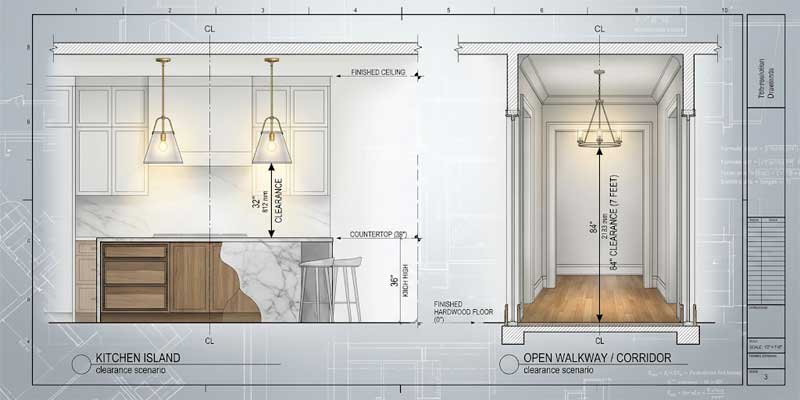
When suspending fixtures above a standard 36-inch high kitchen island or a 30-inch high dining table, the standard baseline clearance is 30 to 36 inches measured from the finished tabletop surface to the lowest rim of the shade. This standard assumes an 8-foot ceiling height. If your ceiling measures 9, 10, or 12 feet, raise the fixture by approximately 3 inches for each additional foot of ceiling height. For a 10-foot ceiling, positioning the pendant base 36 to 42 inches above the counter maintains vertical harmony without drifting into the upper ceiling plane.
Open Walkways and Passage Clearances
When installing a pendant light in entry foyers, open corridors, or living room walkways where people walk directly underneath, maintain a minimum clearance of 7 feet (84 inches) from the finished floor to the fixture base. If vertical clearance falls below 84 inches, transition away from low-hanging cord pendants toward flush or semi-flush overhead mounts to comply with residential building safety codes.
| Suspension Location | Ceiling Height | Standard Clearance Height | Recommended Cord / Rod Type |
|---|---|---|---|
| Kitchen Prep Island | 8 Feet | 30 to 34 inches above counter | Rigid stem or adjustable cord |
| Kitchen Prep Island | 10 Feet | 36 to 40 inches above counter | Segmented metal downrods |
| Dining Room Table | 8 – 9 Feet | 32 to 36 inches above tabletop | Braided fabric cable or chain |
| Open Foyer / Entryway | 10+ Feet | 84 to 90 inches from floor | Heavy-duty aircraft suspension wire |
| Bedside Nightstand | 8 – 9 Feet | 18 to 24 inches above table | Slender braided cloth cord |
4. Select the Right Shade Material and Beam Distribution
The physical composition and geometry of a pendant shade determine how light travels throughout the room. Selecting the wrong shade type creates either piercing lateral glare or an overly dim surface. Pendant shades are categorized into downward task projectors, ambient diffusers, and sculptural uplights.
Solid metal and ceramic shades—such as spun brass, copper, matte black aluminum, or opaque earthenware—channel light strictly downward in a concentrated cone. These work exceptionally well as task lighting directly over kitchen sinks, butcher blocks, and cooking zones where prep visibility is paramount. However, because opaque shades prevent light from traveling outward, they leave surrounding ceiling surfaces in shadow unless balanced by secondary ambient sources.
Translucent glass and woven linen drum shades disperse illumination outward across a full 360-degree radius. Opal frosted glass shades soften LED output, producing flattering, glare-free ambient light ideal for dining areas and social islands. Clear glass cloches showcase decorative filament bulbs beautifully, but require lower lumen output or sandblasted internal diffusers to avoid blinding diners sitting across the table.
Perforated metal, rattan, and geometric cage pendants cast artistic shadows onto adjacent walls. Reserve these decorative shade styles for informal breakfast corners, bohemian lounges, or accent entryways where artistic pattern play enhances the room’s character without impeding detailed culinary prep.
5. Balance Foot-Candles, Lumens, and Glare Control
A common mistake in suspension design is pairing high-output bare bulbs with open shades, resulting in painful contrast glare. Adequate illumination is determined by foot-candles (the density of light reaching the work plane) rather than arbitrary wattage numbers.
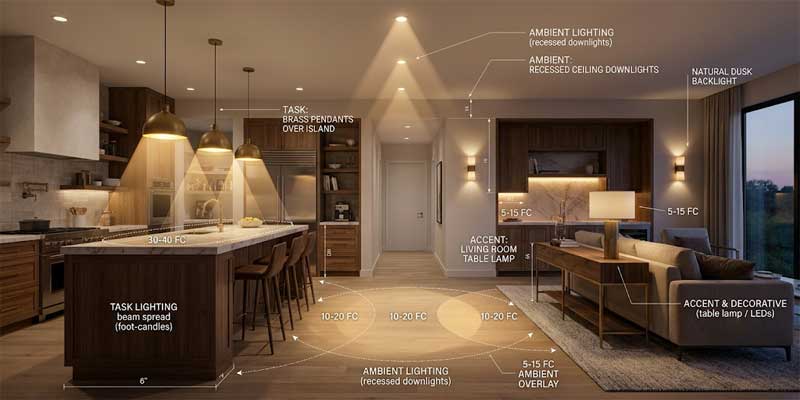
Culinary counters require 30 to 50 foot-candles of targeted task illumination. For a typical 30-square-foot kitchen island (3 feet by 10 feet), you need approximately 900 to 1,500 total lumens distributed evenly across your pendant arrangement. If installing three pendants, each fixture should house a bulb delivering 350 to 500 lumens. Installing three 1,000-lumen bulbs creates an uncomfortably bright hotspot that causes visual fatigue.
Contrastingly, dining tables and entertaining areas require gentle ambient illumination of 20 to 30 foot-candles (approximately 600 to 900 total lumens over the table surface). Incorporating frosted internal bottom diffusers or deeply recessed socket designs conceals the bright diode from view, shielding eyes while diners remain seated.
6. Integrate the Three Layers of Residential Illumination
Even the most striking trio of island pendants cannot carry a room’s illumination needs on its own. Relying exclusively on downward pendants leaves ceiling planes dark and produces heavy shadows beneath perimeter upper cabinets. Interior lighting designers overcome this by organizing the space into three complementary layers: ambient, task, and accent lighting.
Pendants serve primarily as concentrated task and decorative focal points. To complete the architectural lighting framework, surround your pendants with soft ambient illumination, such as recessed perimeter downlights or architectural ceiling coves. This raises overall background light levels and softens the brightness ratio between the pendant shade and the surrounding room.
In adjacent dining and lounge spaces, supplement your ceiling fixtures with portable and accent lighting. Placing complementary table lamps for living room side consoles balances horizontal sightlines, while introducing dedicated bedroom table lamps onto nightstands provides soothing low-level light for winding down. An artfully placed table lamp on a nearby credenza grounds vertical pendant light, creating a continuous, balanced glow across the entire floor plan.
| Lighting Layer | Role in the Space | Fixture Category | Target Color Temperature |
|---|---|---|---|
| Task (Primary Focal) | Targeted illumination over counters, sinks, and worktops | Downlight Pendants, Linear Suspensions | 3000K – 3500K |
| Ambient (Background) | Even foundation lighting to eliminate harsh shadows | Recessed Cans, Ceiling Flush Mounts | 2700K – 3000K |
| Accent (Perimeter) | Highlights vertical planes, art, and furniture surfaces | Table Lamps, Wall Sconces, Cabinet LEDs | 2700K |
7. Address Electrical Junctions, Slope Ceilings, and Dimming Controls
The longevity and usability of a pendant light installation depend directly on structural mounting hardware, ceiling pitch adaptability, and electrical controls. Overlooking these practical details during rough-in wiring creates major installation headaches later.
Ensure that your electrical ceiling junction boxes align precisely with your planned counter layout before dry-walling begins. Islands frequently shift in dimension between initial blueprints and final cabinet installation. If your junction boxes are offset from the finished island center, use low-profile linear canopy conversion kits or adjustable swag hooks to reposition cords without tearing open finished ceiling drywall.
For vaulted, cathedral, or sloped ceilings, verify that the suspension hardware supports angled mounting. While flexible braided cords naturally hang vertically under gravity, rigid metal stems require integrated ball-swivel canopy adaptors to articulate up to 45 or 90 degrees. Attempting to force a rigid stem into a fixed flat canopy on an angled ceiling will bend the mounting threads and cause the fixture to hang crooked.
Finally, never operate your pendant light grouping on a simple on/off mechanical toggle switch. Pair all suspension circuits with a dedicated LED-compatible dimmer (such as an Electronic Low Voltage or reverse-phase TRIAC dimmer). Dimming control allows you to transition seamlessly from bright 100% output during morning meal preparation to a warm 10% candlelit glow for evening dinner parties and entertaining.
Essential Installation and Sizing Checklist
Before ordering and hanging your suspension fixtures, review this concise reference checklist to verify your dimensions and specifications:
- Scale and Diameter: Confirm individual pendant diameter equals 1/2 to 2/3 the total counter width for balanced proportions.
- Edge Clearances: Maintain a minimum 12 to 15-inch setback from the outer counter edges to the pendant perimeter.
- Vertical Hanging Height: Set the fixture base 30 to 36 inches above counter level for 8-foot ceilings, adding 3 inches per additional foot of ceiling height.
- Eye-Level Protection: Choose frosted glass, baffles, or deep shade collars to eliminate direct line-of-sight glare to the bare LED bulb.
- Independent Controls: Wire overhead suspensions to dedicated wall dimmers independent from perimeter ambient recessed cans.
By measuring spatial boundaries, honoring architectural clearance rules, and layering downlight pendants with complementary lighting, you create an inviting, professionally balanced interior built for everyday living.
