
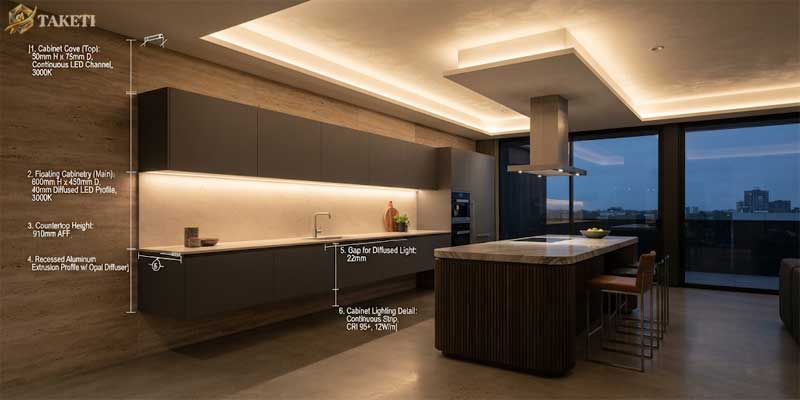
Modern architectural lighting relies heavily on the versatility and clean lines of flexible linear illumination, and nothing delivers ambient sophistication quite like properly configured LED strip lights. Whether creating floating ceiling coves, backlighting entertainment consoles, or upgrading functional kitchen workspaces, these adhesive-backed ribbons are foundational fixtures in contemporary LED Lights design. However, homeowners frequently encounter frustrating installation failures: unsightly visible diode hot spots glaring off polished quartz, strips peeling off cabinetry within days, buzzing power bricks, or ribbons running dim and discolored toward the tail end.
Achieving a seamless, professional installation requires mastering foundational electrical principles, thermal dissipation dynamics, and optical diffusion. Just as upgrading standard lamps requires calculating lumen efficiency and beam spreads from modern led light bulbs, linear tapes demand strict attention to electrical loads. Understanding how to select the right voltage, calculate driver loads, and select appropriate extrusion channels ensures your LED strip lights operate safely, run cool, and maintain uniform color fidelity across their lifespan.
COB vs. SMD: Eliminating Visible Hotspots on LED Strip Lights
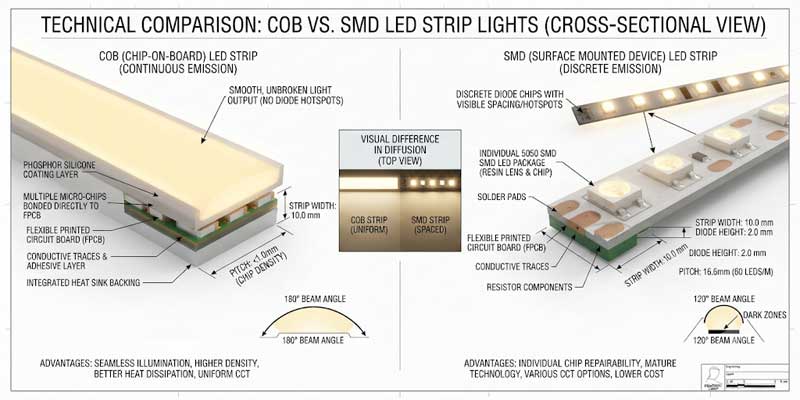
The visual quality of your linear installation depends entirely on diode architecture. Standard retail packages typically use Surface Mounted Diode (SMD) chips, whereas modern architectural installations increasingly specify Chip on Board (COB) technology to eliminate unwanted glare.
1. Traditional SMD LED Strips (2835 and 5050 Chips)
SMD tapes feature individual diode packages soldered at distinct intervals along a flexible printed circuit board (PCB). Common varieties include SMD 2835 (2.8mm x 3.5mm, efficient and compact) and SMD 5050 (5.0mm x 5.0mm, larger multi-core diodes). While SMD strips produce impressive lumen output per watt, their spaced diodes cast harsh, individual points of light known as “hotspots.” When installed beneath kitchen upper cabinets or near glossy surfaces, bare SMD strips reflect visible dotting that looks unfinished unless concealed behind deep milky diffusion lenses.
2. Continuous COB LED Strip Lights
COB technology bonds hundreds of microscopic LED diodes directly to the flexible PCB substrate under a continuous phosphor silicone coating. Packing between 384 and 528 diodes per meter, COB LED strip lights produce a seamless, continuous beam of light with zero visible dots, even when installed without a diffusing lens. For shallow installations where the light tape sits within four inches of a reflective countertop or wall, COB tape represents the gold standard for premium aesthetics.
| Technology | Diode Density | Hotspot Visibility | Best Application |
|---|---|---|---|
| Standard SMD 2835 | 60 – 120 LEDs/meter | Noticeable without deep diffuser | Hidden cove lighting, indirect tray ceilings |
| High-Density SMD | 120 – 240 LEDs/meter | Minimal with frosted lens channel | Under-cabinet counters, floating shelving |
| COB Continuous | 384 – 528 diodes/meter | Completely seamless dot-free beam | Low-clearance surfaces, high-end millwork, reflective marble |
Voltage Selection: Defeating Voltage Drop (12V vs. 24V)
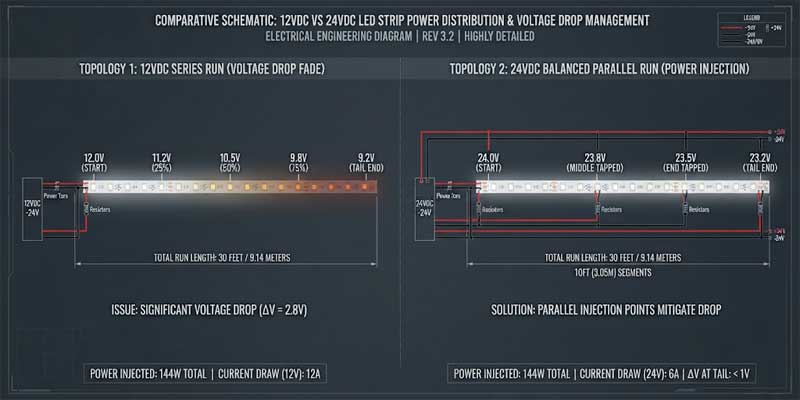
One of the most frequent DIY complaints involves runs of LED strip lights growing noticeably dimmer or shifting toward a reddish tone toward the end of the spool. This symptom is caused by voltage drop—the gradual loss of electrical potential as current travels through thin copper PCB traces.
1. 12-Volt Systems: Compact and Short-Run Friendly
A 12V direct-current system features closely spaced cut lines (typically every 1 to 2 inches / 25mm to 50mm), offering exceptional cut flexibility for tight custom lengths. However, 12V ribbons carry twice the current (amperage) of 24V ribbons to deliver equal power. Because copper trace resistance creates voltage drop proportional to amperage, 12V systems generally experience noticeable dimming beyond continuous runs of 16.4 feet (5 meters). They are ideal for compact desk setups, display cabinets, and short accent runs.
2. 24-Volt Systems: The Professional Standard for Long Continuous Runs
Operating at twice the potential, 24V systems draw half the amperage for identical wattage output. This allows continuous linear runs of up to 32.8 feet (10 meters) from a single power feed without discernible voltage drop or luminance degradation. For large living rooms, crown molding perimeters, and extensive kitchen layouts, choosing 24V LED strip lights prevents uneven illumination and simplifies home electrical distribution.
3. Power Injection Wiring Techniques
When continuous perimeter runs exceed recommended spool limits, you must implement parallel power injection rather than daisy-chaining ribbons end-to-end. By running a secondary 16-gauge or 18-gauge low-voltage line from the power supply directly to the far tail end of the tape (or feeding both ends of a loop), you maintain identical electrical potential along the entire fixture, ensuring absolute color and lumen uniformity.
Driver Sizing and the Essential 80% Headroom Rule
The low-voltage power supply (often called an LED driver or transformer) converts standard 120V alternating household current into smooth 12V or 24V direct current. Under-sizing your power supply generates excessive heat, audible high-frequency coil whine, intermittent shutoffs, and premature component failure.
1. Calculating Total System Wattage
To determine the minimum power supply capacity required for your installation, locate the manufacturer’s rated power consumption per linear foot or meter. Apply this formula:
Total Load (Watts) = Total Run Length (Feet/Meters) x Power Consumption (Watts per Foot/Meter)
For example, if you plan to install 20 feet of tape that consumes 3.5 watts per linear foot, your base electrical demand is 70 watts.
2. The Continuous Load Safety Margin
Under the National Electrical Code (NEC), electronic transformers serving continuous loads (lighting running longer than three hours) must not exceed 80% of their rated maximum capacity. To calculate the appropriate driver rating:
Minimum Driver Capacity = Total Load (Watts) / 0.80 (or multiply total load by 1.25)
Using our 70-watt calculation: 70 / 0.80 = 87.5 watts. In this scenario, you must round up to the next standard commercial unit, selecting a robust 96-watt or 100-watt Class 2 regulated LED power supply. This ensures the transformer operates at moderate temperatures and preserves the longevity of your LED strip lights.
Decoding Color Spectrum: CCT, CRI, and Smart Multi-Color Chips
Light quality directly impacts interior ambiance, eye strain, and architectural warmth. When evaluating flexible ribbons, look beyond pure lumen counts and evaluate spectral properties:
- Correlated Color Temperature (CCT): For warm residential environments and bedroom perimeters, 2700K delivers inviting, golden radiance matching traditional incandescent bulbs. For modern kitchens and task-heavy workstations, 3000K to 4000K provides crisp, energetic visual clarity without sterile hospital tones.
- Color Rendering Index (CRI): Always demand tapes rated at CRI 90+ (with an R9 saturated red value above 50). Cheap commercial ribbons with CRI 80 distort natural wood grains, make food look unappealing, and alter wall paint tones.
- RGBW vs. RGBIC (Digital Addressable): While standard RGB blends colors to simulate white light (producing a faint bluish hue), RGBW ribbons incorporate dedicated white diodes for genuine task lighting. For dynamic accent zones, RGBIC ribbons integrate embedded IC microchips, allowing independent color control across multi-zone segments simultaneously.
Mounting Perfection: Thermal Dissipation with Aluminum Channels
The primary enemy of light-emitting diodes is trapped thermal energy. While LED strip lights run dramatically cooler than halogen or incandescent sources, high-density chips generate localized heat within their miniature printed circuit boards. Sticking high-output LED tape directly onto insulated painted drywall or unfinished wood traps heat, drying out factory adhesive tapes and degrading phosphor coatings within months.
1. Aluminum Extrusion Profiles
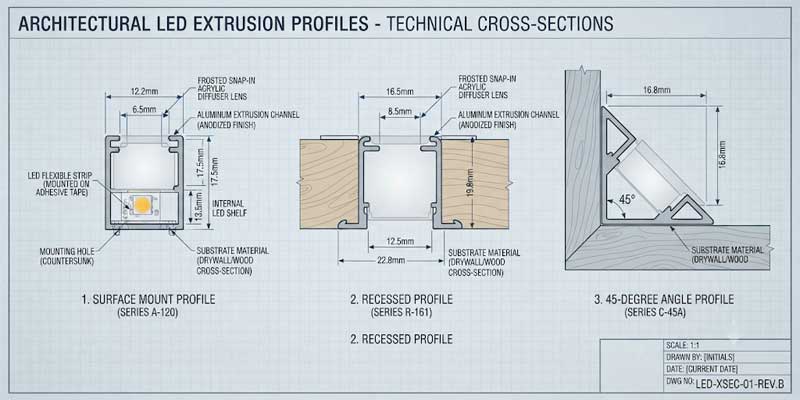
Anodized aluminum extrusion channels act as heavy-duty thermal heat sinks. Drawing ambient heat away from the PCB substrate, aluminum profiles keep diodes running cool, effectively extending usable lifespan up to 50,000 hours. Extrusions are available in flat surface-mount, recessed flush-mount, and 45-degree angled profiles designed specifically for under-cabinet counter illumination.
2. Diffusion Lenses
Aluminum channels include click-on or slide-in acrylic covers. Frosted and milky white diffusers homogenize light rays, widening the beam angle from a focused 120-degree cone into a soft 180-degree wash while fully concealing internal circuitry and wiring solder joints.
3. Surface Preparation and Fastening
Never rely exclusively on pre-applied adhesive tape when installing overhead or vertical runs. Before sticking tape down, wipe aluminum channels with 90% isopropyl alcohol to remove manufacturing oils and dust. For long-term peace of mind, fasten aluminum extrusions using mechanical mounting brackets screwed securely into framing or cabinet rails.
Corner Turns and Wiring for LED Strip Lights
Flexible ribbons bend easily along their flat axis, but forcing a 90-degree lateral bend on flat tape cracks internal copper traces. To navigate interior and exterior architectural corners, utilize these proven strategies:
1. Solderless Push-Fit and Hippo Clip Connectors
Solderless connectors feature miniature piercing teeth that clamp onto exposed copper contact pads. Choose transparent, terminal-style connectors matching your exact tape width (typically 8mm, 10mm, or 12mm) and pin spacing. Ensure the polarity markings (+ and -) align across every splice.
2. Direct Wire Soldering
While push-fit connectors are convenient, professional electrical contractors overwhelmingly favor direct soldering. Soldering short lengths of flexible stranded wire between ribbon segments creates a permanent mechanical joint with zero resistance, completely eliminating connection faults inside tight wall cavities or millwork corners.
Pairing architectural cove ribbons with curated accent luminaires like a sculptural Table Lamp creates depth and balance across your entire residential lighting plan.
By matching voltage to run lengths, sizing power supplies with proper safety headroom, and encasing your ribbon inside rigid aluminum heat sinks, you transform fragile tape into durable, high-performance LED strip lights that operate flawlessly for years.

Pingback: Under Cabinet Lighting: 5 Pro Rules to Wire and Layout Right