
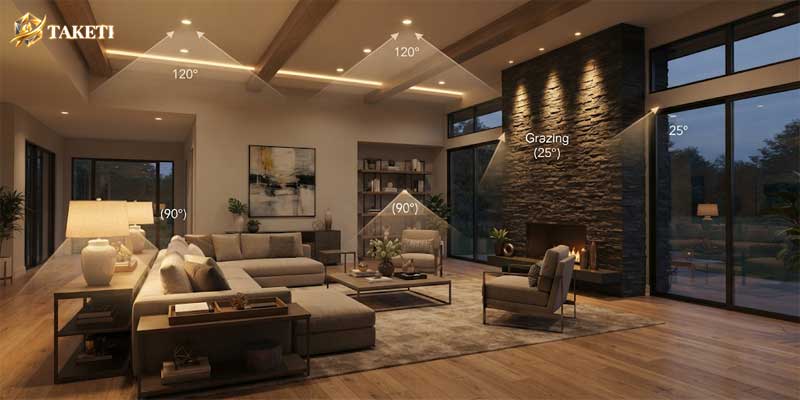
Planning an effective living room lighting scheme is one of the most critical interior design decisions you will make for your home. The main living space is rarely dedicated to a single activity; it serves as a central hub where family members gather to converse, watch television, read, host guests, and unwind after demanding workdays. Despite this multifaceted role, countless homeowners make the costly mistake of depending entirely on a single overhead ceiling fixture. This outdated practice floods the room with flat, harsh, downward illumination that washes out textures, casts unflattering facial shadows, and makes a carefully furnished interior feel clinical and unwelcoming.
Achieving a balanced living room lighting plan requires abandoning the one-fixture mindset and embracing a professional technique known as light layering. By harmonizing foundational ambient light, focused task illumination, and artistic accent highlights, you can mold the room to fit any time of day or social gathering. In this definitive guide, we deliver seven proven rules, complete with exact technical formulas, sizing proportions, and placement guidelines to help you create a cozy, luxurious sanctuary.
Why Proper Living Room Lighting Dictates Interior Comfort
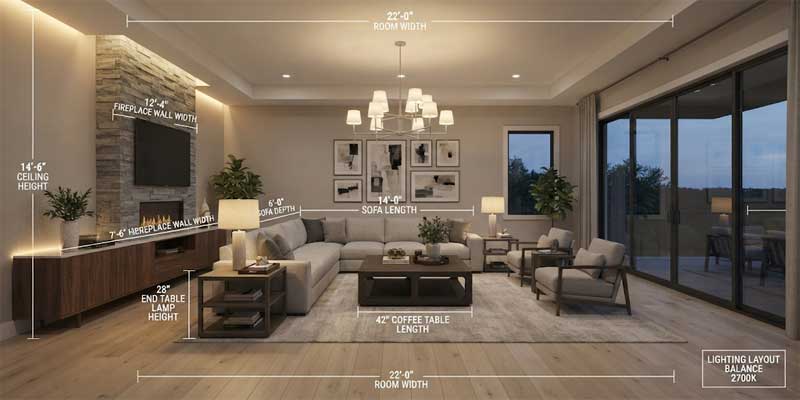
Illumination alters human perception, emotional state, and physical comfort. When living room lighting is poorly calculated, occupants routinely suffer from sub-conscious visual fatigue, headaches, and disrupted circadian rhythms caused by excessive nighttime glare. From a decorative standpoint, inadequate illumination shrinks usable square footage by leaving corners in dark gloom while overexposing central coffee tables.
Conversely, an intentional living room lighting layout defines functional zones within an open-concept layout. It guides visual traffic, establishes an inviting residential ambiance, and showcases architectural textures such as exposed timber beams, brick fireplaces, and textured wallpaper. Mastering this craft requires an intimate understanding of the three foundational light layers.
The 3 Structural Layers of Living Room Lighting
Lighting professionals never treat a living space as a two-dimensional floor plan. Illumination must be sculpted vertically and horizontally through three distinct layers. Balancing these tiers guarantees that no single fixture is forced to work beyond its intended purpose.
1. Ambient Lighting: The Foundational Base
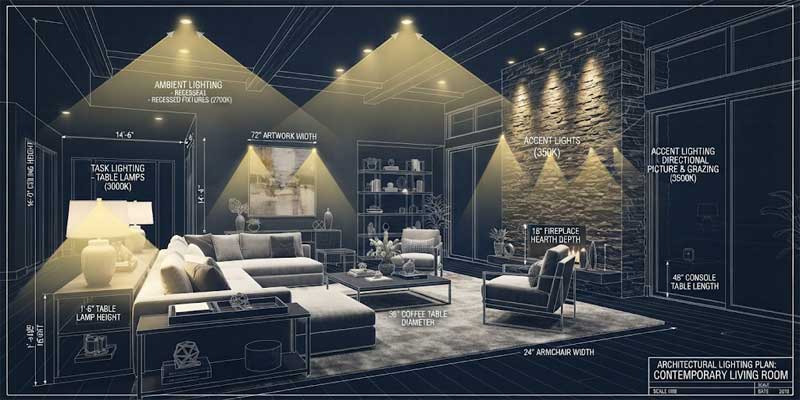
Ambient illumination acts as the base canvas for your entire layout. It replaces natural daylight as the sun sets, supplying overall baseline brightness so family members can navigate the space safely without bumping into furniture. In contemporary living room lighting designs, ambient brightness is typically generated through a grid of recessed ceiling cans (downlights), a central flush-mount or semi-flush fixture, cove perimeter lighting, or a statement chandelier. The crucial objective for ambient light is even distribution without overwhelming hotspots or aggressive downward glare.
2. Task Lighting: The Functional Workhorse
Task illumination delivers concentrated, directional foot-candles directly to areas where specific visual activities occur. In a typical living space, task demands center around reading novels, operating laptops, writing, playing board games, or crafting. The most versatile and aesthetically pleasing source of task illumination remains a well-proportioned Table Lamp placed within comfortable arm reach of sofas and armchairs. Quality task fixtures shield the bare bulb from direct eye contact while casting a generous, glare-free light pool downward onto work surfaces.
3. Accent Lighting: Depth and Architectural Drama
Accent illumination provides visual punctuation. It carries minimal functional responsibility for navigation or reading; instead, its purpose is purely aesthetic. By delivering illumination at roughly three times the intensity of surrounding ambient light, accent fixtures draw the human eye toward focal points such as framed oil paintings, sculptured ceramics, floating shelves, or masonry hearths. Picture lights, directional eyeball spotlights, and hidden LED channel strips constitute the primary tools for this layer, adding perceived luxury to your overall living room lighting arrangement.
7 Engineering Rules to Master Living Room Lighting
Transitioning from lighting concepts to a flawless practical installation requires clear measurements and placement boundaries. Apply these seven field-tested rules to eliminate guesswork from your project.
Rule 1: Calculate Total Lumens Based on Room Square Footage
Never purchase bulbs based on wattage alone. Wattage measures electrical energy consumption, whereas lumens measure actual light output. To establish an optimal baseline for living room lighting, lighting engineers recommend providing 10 to 20 lumens per square foot of general ambient space, augmented by 30 to 50 lumens per square foot over targeted task zones.
| Room Dimension (Feet) | Square Footage | Ambient Lumens Needed (15 lm/sq ft) | Recommended Fixture Allocation |
|---|---|---|---|
| 12 x 14 ft | 168 sq ft | 2,520 Lumens | 4 Recessed Cans (500 lm each) + 1 Accent |
| 14 x 18 ft | 252 sq ft | 3,780 Lumens | 6 Recessed Cans (500 lm each) + Chandelier |
| 16 x 22 ft | 352 sq ft | 5,280 Lumens | 8 Recessed Cans + Perimeter Cove Strips |
| 20 x 24 ft | 480 sq ft | 7,200 Lumens | Multi-circuit system with 10+ Cans & Pendants |
For example, if your living area measures 250 square feet, your ambient baseline requires roughly 3,750 lumens. Rather than generating this with four blistering 1,000-lumen bulbs in an overhead fixture, distribute that output across six 500-lumen recessed fixtures combined with localized table and floor sources. This distribution eliminates glare and softens contrast ratios.
Rule 2: Anchor Seating Zones with the Triangle Distribution Method
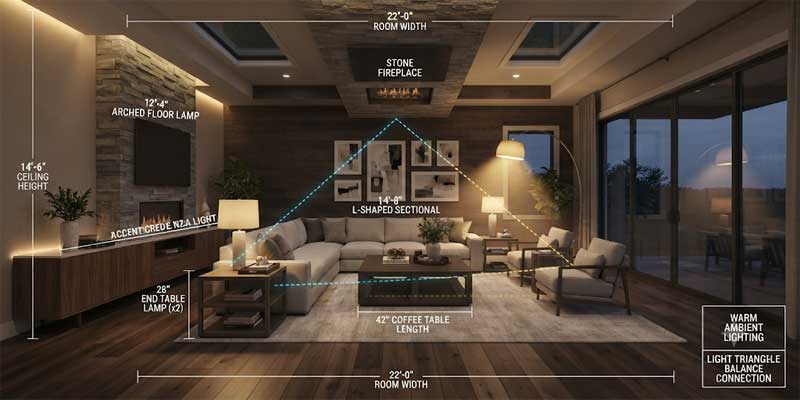
Even illumination does not mean placing lamps randomly across perimeter baseboards. The human brain craves visual harmony, which interior designers achieve through the Triangle Distribution Method. In any conversation grouping, arrange three separate light sources at varying heights to form an equilateral or scalene triangle when viewed from above.
A classic execution includes placing an arched floor lamp in the rear left corner (providing elevated light at roughly 60 inches), positioning a dedicated pair of Table Lamps For Living Room on side tables flanking the sofa (mid-level light at 28 to 32 inches), and balancing the far right quadrant with a low-wattage accent fixture or illuminated credenza display. This triangular configuration draws visual focus naturally across seating perimeters, making social zones feel intimate and cohesive.
Rule 3: Enforce Strict Color Temperature Consistency (2700K vs. 3000K)
One of the fastest ways to cheapen an otherwise high-end living room lighting design is mixing incompatible light temperatures. Color temperature is measured on the Kelvin scale. A 5000K daylight bulb emits a piercing, icy-blue beam that clashes violently with a warm 2700K incandescent-style lamp sitting just five feet away.
| Kelvin Rating | Tonal Quality | Psychological Effect | Best Application in Living Spaces |
|---|---|---|---|
| 2200K – 2400K | Candlelight Amber | Deep relaxation, intimate, drowsy | Exposed filament Edison bulbs, decorative lanterns |
| 2700K | Warm White (Classic Home) | Cozy, peaceful, welcoming | All table lamps, floor lamps, relaxing living zones |
| 3000K | Soft Neutral White | Crisp, modern, attentive | Recessed ceiling downlights, contemporary art displays |
| 4000K – 5000K | Cool Daylight | Alert, clinical, energetic | Strictly avoid; belongs in garages or commercial offices |
For residential living areas, standard practice dictates maintaining all general fixtures within a narrow band of 2700K to 3000K. If your room features rich hardwoods, warm leather upholstery, and earth-toned walls, standardize on 2700K across every fixture. If your aesthetic relies on crisp marble, stark grays, and contemporary metals, 3000K supplies the necessary clarity without feeling uncomfortably cold.
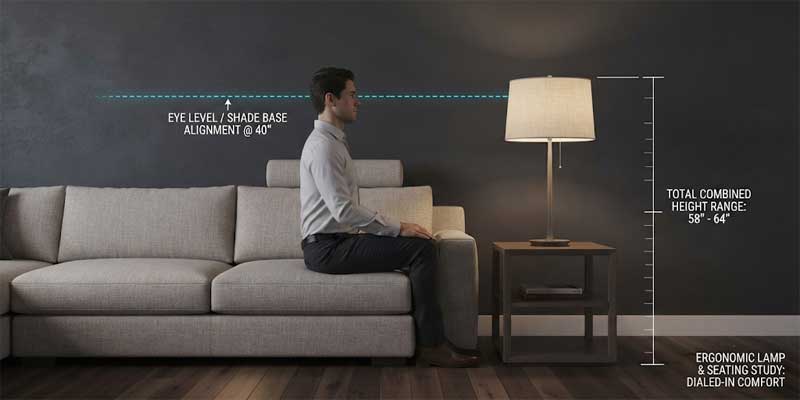
Rule 4: Align Table Lamp Heights with Eye-Level Ergonomics
A table lamp should illuminate surrounding surfaces without blinding seated individuals. When relaxing on your sofa or accent chair, your seated eye level sits between 38 and 42 inches above the finished floor. The golden rule for living room lighting task fixtures is ensuring that the lower rim of the lampshade rests exactly at eye level when you are seated.
To achieve this alignment, the combined height of your end table plus the lamp base must total between 58 and 64 inches from the floor to the top of the lamp finial. If your sofa arm rests on a low 22-inch end table, pair it with a taller 30-to-32-inch table lamp. Conversely, if your accent table stands 26 inches tall, choose a compact 26-to-28-inch fixture. This precise calibration keeps the bulb hardware and neck hidden beneath the shade flare, preventing direct retinal exposure.
Rule 5: Incorporate Dedicated Dimming Controls Across Every Circuit
Static lighting is the enemy of dynamic living spaces. A living room lighting layout that functions adequately on a cloudy Sunday afternoon will feel oppressively bright and clinical during an evening cocktail gathering. Installing electronic low-voltage or LED-compatible dimmer switches across every primary circuit gives you instant authority over the spatial mood.
Separate your fixtures onto dedicated electrical circuits wherever possible. Keep recessed perimeter downlights on one dimmer, central ambient chandeliers on a second, and peripheral accent or wall sconces on a third. For portable table lamps and floor units, utilize plug-in tabletop slider dimmers or integrated smart plugs that allow preset lighting automation. Dimming down to 30% intensity during late evenings signals the human body to release melatonin, directly aiding nighttime relaxation.
Rule 6: Eliminate Screen Glare with Strategic Bias Lighting
Modern living areas are frequently arranged around ultra-thin high-definition television screens. Position an unshielded light fixture directly across from the display, and you will create an intolerable mirror reflection that degrades picture quality and strains the eyes. However, watching a brilliant screen in a pitch-black room causes ocular exhaustion because the pupil must continuously contract and dilate against high contrast shifts.
The solution is bias lighting. Mount a low-profile LED light strip along the rear perimeter of your television frame, set to cast a soft halo of 2700K-3000K light against the drywall behind the screen. This increases the ambient field luminance directly surrounding the monitor, neutralizing eye strain while preserving screen contrast and black levels. Furthermore, ensure any nearby living room lighting fixtures utilize opaque or densely woven linen shades that channel light vertically rather than horizontally into the viewing axis.
Rule 7: Graze Vertical Surfaces to Visually Expand Room Volume
Rooms feel constricted not because of modest square footage, but because their vertical boundaries dwell in shadow. The human eye gauges spatial dimensions by calculating the distance to illuminated perimeter walls. If your walls remain dark, the room feels enclosed and boxy.
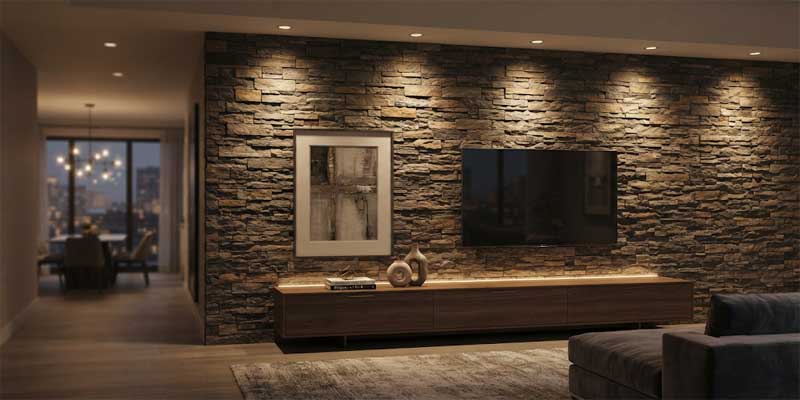
Implement wall grazing and wall washing within your living room lighting layout. Position recessed adjustable eyeball downlights approximately 24 to 30 inches away from vertical feature walls, spacing them roughly 30 inches apart. Angle the beams downward at 30 degrees to softly bathe stonework, gallery displays, or acoustic wood slatting in an even wash of light. This technique elevates textural depth while visually pushing the walls outward, making compact living quarters feel substantially more spacious.
Frequent Living Room Lighting Traps to Avoid
Even seasoned home renovators stumble into common design errors that undermine their lighting investment. Review these four design traps before finalizing your layout:
- The Grid of Interrogation Downlights: Installing an aggressive symmetrical grid of recessed cans directly over seating turns your living space into an interrogation chamber. Recessed lights should graze walls, highlight walkways, or wash artwork; they should never shine directly down onto seated guests’ heads.
- Lampshade Scale Disconnect: Pairing a tiny shade with a hefty ceramic base, or placing a massive drum shade on a delicate metal spindle, produces visual dissonance. A lampshade’s diameter should ideally measure within two inches of the base’s overall height.
- Disregarding Color Rendering Index (CRI): Low-cost LED bulbs frequently feature CRI ratings below 80, which drains life from furnishings, turning rich wood finishes muddy and giving skin tones a sickly green cast. Insist on 90+ CRI bulbs across your entire living room lighting installation.
- Neglecting Corner Voids: Leaving deep room corners unilluminated visually truncates the space. Tuck a slim torchiere, an upward-pointing floor canister, or an artistic floor lamp into distant corners to preserve unbroken visual depth.
Transform Your Space with Intentional Living Room Lighting
A masterfully designed living space is defined not merely by the price of its sofa or the rarity of its rug, but by how light interacts with its textures, furnishings, and occupants. By establishing a robust three-tier foundation—ambient warmth, ergonomic task delivery, and artistic accent punctuation—you craft a home that shifts effortlessly from an energetic morning workspace to a tranquil, candlelit evening retreat.
Evaluate your current room configuration tonight. Measure your table lamps against your seated eye line, separate harsh overhead fixtures onto dimmers, and introduce a balanced triangular layout. With purposeful living room lighting, you elevate your home into an exceptionally comfortable and visually captivating haven.
