
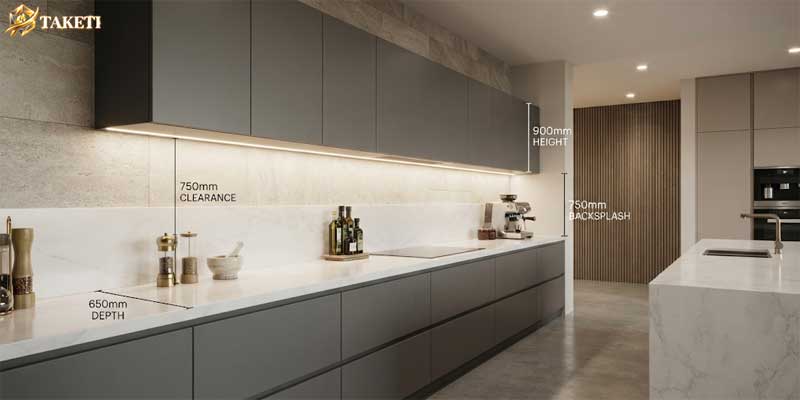
Few kitchen upgrades deliver the high-impact functional and aesthetic return of properly engineered Under cabinet lighting. While overhead ceiling cans cast annoying shadows directly over cutting boards and food prep zones, dedicated counter luminaires flood task areas with crisp, shadowless illumination. As a crucial pillar of modern residential LED Lights architecture, lower-cabinet fixtures eliminate visual fatigue while adding layered warmth to evening entertaining. Yet, homeowners and remodelers routinely stumble into frustrating installation blunders: harsh diode hotspots bouncing off polished stone, visible trailing cables, buzzing transformers, or fixtures mounted too far back against the backsplash wall.
Executing a flawless kitchen counter setup demands strict attention to fixture placement geometry, power supply management, and surface reflection properties. Whether complementing functional meal prep spaces with ambient dining accents or integrating perimeter accent ribbons from professional LED strip lights, planning your cabinet illumination early guarantees a clean, wire-free finish. Understanding how to select the right form factor, calculate electrical driver loads, and calibrate color temperatures ensures your fixtures operate safely and look tailor-made for your home.
Fixture Selection: Bars, Pucks, or Tape Under Cabinet Lighting
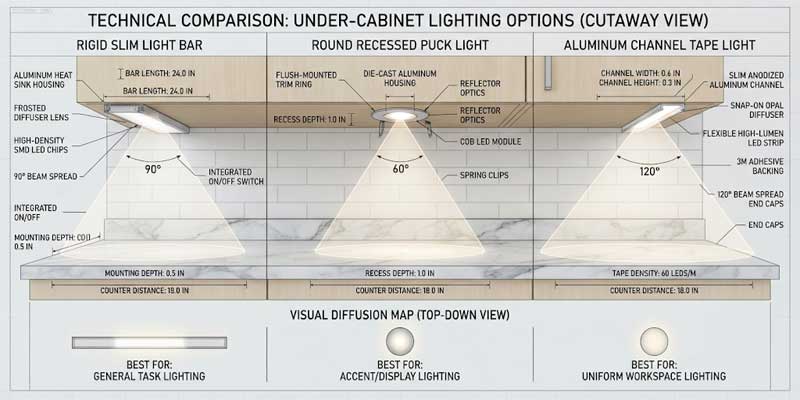
Choosing the correct fixture style determines light uniformity across your countertops. Residential kitchens generally utilize three primary configurations for Under cabinet lighting:
1. Linear Rigid LED Light Bars
Rigid light bars represent the contractor standard for uniform task illumination. Housed in self-contained aluminum casings with built-in prismatic diffusion lenses, bars produce an even beam angle with zero diode visibility. Most commercial models feature internal drivers, onboard rocker dimmers, and push-click linking cables that let you daisy-chain multiple units across continuous cabinet spans from a single electrical knockout box. They are best suited for deep cabinets with substantial front light valances that conceal their 1-inch physical profile.
2. Puck Lights (Recessed vs. Surface Mount)
Round puck fixtures deliver dramatic, scalloped pools of accent light rather than uniform task washes. Measuring 2 to 3 inches in diameter, pucks work exceptionally well inside glass-front display cabinets or beneath open floating shelves. However, installing pucks under standard meal prep runs creates alternating bright cones and dark triangular voids between units. To prevent dark gaps, pucks must be spaced tightly—typically 8 to 12 inches on center—which significantly multiplies low-voltage interconnect wiring behind the scenes.
3. Flexible Continuous COB Tape Lights
For shallow cabinets lacking bottom recess lips, ultra-thin tape ribbons mounted inside slim aluminum extrusions provide the sleekest profile. Utilizing continuous Chip on Board (COB) technology eliminates hot spots completely, turning the underside of the upper cabinet into an invisible, seamless plane of radiance. Because tape can be cut to custom lengths down to the inch, it accommodates non-standard cabinet runs where modular rigid bars leave unlit corners.
| Fixture Style | Light Pattern | Profile Depth | Ideal Installation Area |
|---|---|---|---|
| Linear Rigid Bars | Wide continuous flood wash | 3/4″ to 1-1/4″ deep | Primary food prep counters with face-frame trim |
| Round Puck Lights | Scalloped cones / spot beams | 1/2″ surface / flush recessed | Coffee bars, curio display shelves, open hutches |
| COB Tape in Channels | Ultra-smooth continuous line | 1/4″ to 3/8″ slim profile | Frameless Euro-style millwork, reflective marble surfaces |
Placement Geometry: Front Rail vs. Backsplash Mounting
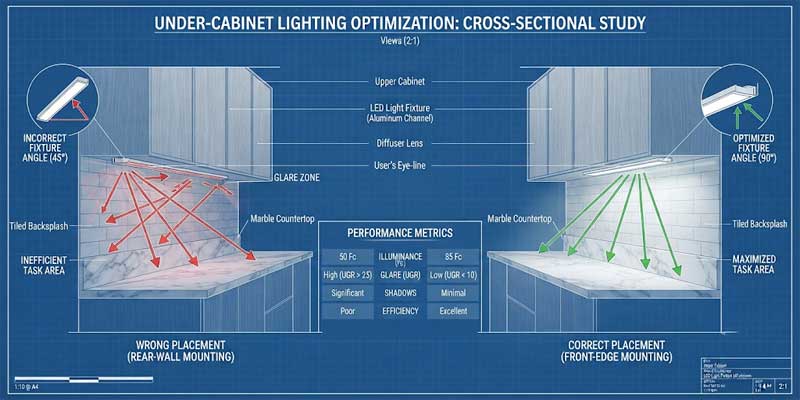
The single most widespread homeowner mistake is pushing fixtures all the way back against the tiled wall. Mounting luminaires rearward highlights wall tile imperfections and casts deep shadows across the center of your cutting board where hands and knives work.
1. The Front Lip Rule
Professional electricians always mount Under cabinet lighting along the front underside of the upper cabinet, directly behind the front face-frame rail or decorative light valance. Positioning the light fixture forward angles the beam downward and backward toward the middle of the counter. This provides full illumination across the entire 24-inch countertop workspace while shielding seated eyes from direct bulb glare.
2. Mitigating High-Gloss Glare on Quartz and Granite
Polished stone countertops act like dark mirrors. If bare SMD diodes face downward over polished black granite or glossy white quartz, you will see blinding point reflections that cause headaches. When mounting over reflective stone, always choose fixtures with thick frosted diffusion lenses, or use a 45-degree angled corner channel aimed back toward the backsplash tile rather than straight down onto the polished surface.
Hardwired vs. Plug-In: Power Supply Engineering
Power delivery determines whether your project resembles an invisible architectural element or an amateur DIY cord disaster. Choosing how to feed electrical current to your lower cabinetry dictates long-term reliability.
1. Direct Hardwired 120V Line Voltage
Hardwiring connects directly into a standard 120V household branch circuit through an electrical wall box hidden inside the cabinetry or behind the drywall. Line-voltage fixtures receive AC power straight from a dedicated wall switch or wall dimmer. This is the cleanest, most permanent installation, eliminating external transformers and keeping countertops completely free of cords. However, it requires running Romex 14/2 cable inside wall cavities prior to tile backsplash installation.
2. Centralized Low-Voltage (12V / 24V) Drivers
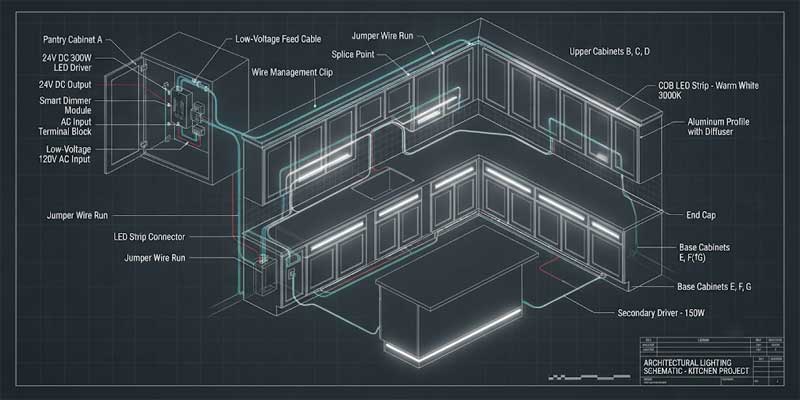
Low-voltage Under cabinet lighting systems rely on a dedicated Class 2 transformer to convert 120V AC into safe 24V DC. Instead of running bulky electrical conduit under every individual cabinet section, you place one centralized driver inside an upper pantry cabinet, attic space, or basement. From that central driver, thin CL2-rated in-wall low-voltage wires branch out invisibly behind upper cabinet rails, making interconnects through cabinet partition dividers simple and discreet.
3. Plug-In Systems for Renters and Retrofits
Plug-in setups convert existing backsplash GFCI electrical outlets into power feeds using a discreet cord and 24V desktop adapter. While plug-in kits offer plug-and-play simplicity without opening drywall, keeping cords tidy requires adhesive cable clips routed along cabinet interior stiles or hiding power supplies inside an appliance garage.
CCT Calibration and Food Clarity (CRI Standards)
Color rendering in a kitchen is not merely decorative—it is critical for food safety and accurate culinary prep:
- 2700K Warm Glow: Excellent for cozy evening pass-through lighting, but often makes raw meat, green leafy vegetables, and marble veining look dull and yellowed.
- 3000K Warm Neutral: The industry benchmark for traditional and transitional kitchens. It provides clean visual warmth without looking clinical, pairing beautifully with natural oak and warm wood cabinetry.
- 3500K – 4000K Clean White: The optimal choice for modern white kitchens, stainless steel appliances, and quartz waterfall islands. It provides razor-sharp visual clarity without fatiguing the eyes.
- Color Accuracy (CRI 90+): Never compromise on Color Rendering Index in food prep zones. Demanding fixtures with a CRI rating above 90 and high R9 saturated red values ensures meats look fresh, produce appears vibrant, and tile textures retain their genuine color tones.
Overcoming Obstacles: Routing Across Stoves and Windows
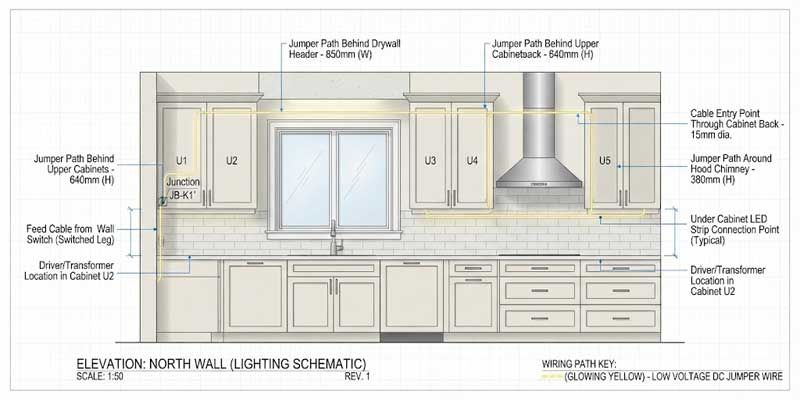
Cabinet runs are rarely continuous. Range hoods, slide-in stoves, and sink windows constantly sever lower cabinet continuity, posing wiring routing challenges for uninterrupted Under cabinet lighting.
1. Bridging the Cooktop Gap
Never route standard plastic-jacketed lighting wire behind or above a cooking range where heat, rising grease, and steam destroy cable insulation. When cabinet runs break at the stove hood, pull a dedicated feed from the electrical rough-in to both left and right cabinet banks independently, or route your interconnect jumper cable up over the ceiling line inside metal armored conduit.
When bridging a sink window, dropping an exposed wire across the window frame ruins kitchen sightlines. The proper technique involves fishing a low-voltage Class 2 jumper line up into the wall header cavity above the window frame, or looping downward beneath the floorboards inside the crawlspace or basement before coming back up into the adjoining cabinet bank.
Pairing seamless counter lighting with tailored ambient luminaires like an artisanal Table Lamp on an adjacent breakfast sideboard creates a balanced, multi-tiered illumination scheme across open-concept layouts.
By positioning fixtures tight behind the front rail, utilizing frosted lenses over polished stone, and sizing low-voltage drivers with ample headroom, your Under cabinet lighting transforms daily meal preparation into an effortless, luxurious kitchen experience.
